47 cm f5 mirror
Jan. 1999
I bought the 48 x4,0 cm Suprax low expansion disk from Beacon Hill telescopes in Cleethorpes (UK) . net price : 408 pounds
Spring 1999
I had a f5.1 radius generated in the disk by J.Eindhoven in the village of Buurse. Cost F175 ( 80 euro)
November 1999
As a grinding tool; I made a disk of plaster on top of the mirror disk. You make a dam of cardboard(2 mm thick) around the disk, tape it snug and apply a layer of Vaseline tot the cardboard and the mirror.
Making and casting the plaster (calcium sulphate) is something you have to learn first!
Too much water makes it too weak, too little water results in a mix you can’t pour!
By the way : it is much cheaper to buy the plaster in 20 kg bags than in small 2,5 kg bags in the building market.
Once you have filled the dam with plaster you have to make the top layer even with the help of a peace of wood.
Drying takes at least a week,according to my experience.I put the disc on a pile of newspaper to speed up the drying. Every day I changed the papers.
For my first try with grinding tools I glued 35x35x 8 mm ceramic tiles with epoxy resin on the plaster. First I had made a line drawing to give the tiles their proper place.
After the glue had hardened, I protected the plaster with poly urethane floor varnish (3 layers)
Dec.30 ,1999
First step: making the grinding tool fit the mirror.First try with mirror above and C240 wasn’t a success. The tiles are too high and the grinding powder stays too low.
Second try : mirror face up with a ¼ to 1/3 straight stroke and W-stroke is OK
One can follow the adaption of the grinding tool tot the mirror by monitoring the behavior of ink crosses on the individual tiles.
After 65 turns of C240 the majority of the tiles was still untouched.
C180 : after 155 turns still too many tiles untouched
Jan 17, 2000
I have enough of this tool
Another one is made , this time with much thinner tiles: 19x19x 2 mm.
270 of them were needed!. Tiles on the edge of the tool were partly nibbled away with a pair of pliers.
C320 : after 175 min of grinding (mirror above and below) only 20 tiles were untouched.
Total time 315 minutes for C320. That’s the time it took to get all the tiles in touch with the mirror and to grind out the larger pits.
Sept. 7, 2000
C600
- 60 min mirror above: ink cross stays very long on outside tiles
- 120 min : I add new carborundum suspension after every 3 rounds around the grinding post
Sep. 22: 330 min grinding time. All pits cleared
C800
Total time 125 min with mirror below and above
C 1200
The edge of the mirror is ground with a 400 stone
Total time 120 min mirror below and 40 min mirror above
Mirror surface looks OK
POLISHING
Feb. 5, 2001
The polishing tool is made of plaster (calcium sulphate) . diameter 40 cm, thickness 5 cm.
The plaster was cast on a 40 cm f4.5 mirror that was still in the grinding stage. It is coated with 3 layers of weatherproof varnish.
The molten pitch is cast on the surface (cardboard dam around the tool) and in the not yet hardened pitch channels are pressed with a coat hanger.
Polishng stroke : mirror below W-stroke ; 3 cm overhang (i.e. edge of tool passes 3 cm over mirror’s edge).
Polishing isn’t going well. Scratching the polishing squares is a great help for smoother movement of the lap
120 minutes : great scratch discovered!
The grinding tool is dug up again and grinding with C1200 starts again. Several other scratches are found; again the edge of the mirror and the grinding tiles are smoothed with the 400 stone
After 190 minutes with C1200 I am ready to start polishing again
POLISHING (second try)
This time a 48 cm pitch lap is made on a 48 cm plaster tool (cast on this mirror).
Pitch squares are 4x 4 cm . They are scratched with a sharp knife.
June 19 2001
Total polishing time ; 7 hours in periods of 15 min. all the time TOT.
July 1 Total time 17,5 hours . All the time mirror above.
Reflection test( 25 W clear bulb focused with 50 mm f2 lens) : weak in middle and on edge of mirror)
July 15
Pitch squares covered with fresh pitch, applied with a stiff brush. Squares scratched again.
July 23
Total polishing time 22 h 45 min Mirror above
Reflection test : very weak reflection(in dark room)
August 2
30 hours polishing time (mirror above) Reflection test: extremely weak.
Why all the time the mirror above? Iwas afraid of scratsches with the mirror below!
CORRECTION OF THE MIRROR
I build a rig for star testing the mirror. It was important to know whether the mirror was astigmatic.
Test on Polaris with 12 mm : no astigmatism
Correction to parabola:
I made the following pitch laps : 48 cm ( on plaster disc), 25 cm ( on plaster disc), 15 cm ( on glass disc), 10 cm ( on glass disc)
The pitch was Gugolz 55 + some old 64, softened with turpentine and linseedoil antil the hardness was 7mm /20 oC/ 1mm tip. This is a test mentioned in the book by Texereau(telescope making). The pitch was relatively soft.
Test of the mirror:
Ronchi : spherical with turned up edge region (several cm)
Foucault : diffraction ring completely around the mirror.
The mirror was placed on a 9 mm thick disc of foam rubber on a plywood base of 25 mm thickness on the polishing/grinding table.
Step 1
25 cm pitch lap with ceriumoxide
- large W-stroke with 5-7 cm overhang(that is, the edge of the lap over the mirror’s edge 5 5 turns
- straight stroke 0-1 cm from Center and 5-7 cm over. 20 turns
- W-stroke 5-7 cm over (also left and right 5-7 cm over) 5 turns
- Straight stroke 0-1 cm from center 20 turns
- W-stroke (like c) 3 turns
Test : Ronchi : lines start to bulge. No TDE or turned up edge.
In the meantime the thickness of the pitch is reduced from 7 to 4 mm! Obviously too soft. I scratch the pitch for a smooth movement.
Step 2
25 cm pitch lap
Strokes with 4-7 cm overhang
- straight stroke 0-1 cm left of C 10 turns
- id 10 turns
- W-stroke 3 turns
- like b 20 turns
Foucault:
Picture of the tester(moving light source)
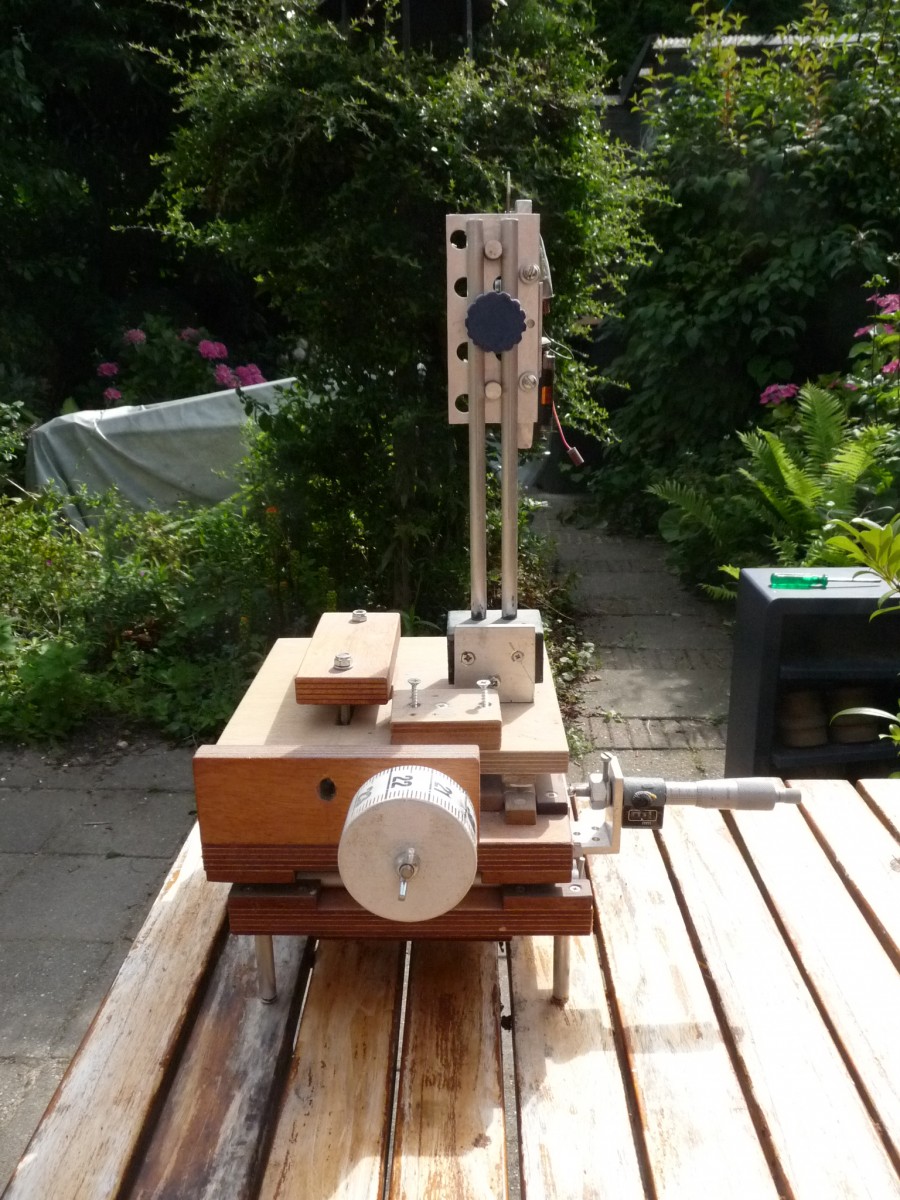
At the right you see the accurate micrometerscrew,necessary for reading the zones at 0,01 mm
Radius of curvature of mirror =4843 mm
Measurements of h2/2R
h = radius of zone and R=radius of curvature
| Zone | 1 | 2 | 3 | 4 | 5 | 6 | 7 |
| Measurements | 0 | 0 | 0,1 | 0,5 | 1,1 | 1,4 | 1,3 |
| Parabola | 0 | 0,98 | 1,81 | 2,63 | 3,45 | 4,27 | 5,05 |
Edge area turned up!
Step 3
- Increasing the correction:
15 cm soft pitch lap straight stroke 1-3 cm left of C
5 cm overhang …. 30 turns
2. 25 cm lap straight stroke 0-1 cm left of C; 5-7 cm overhang
10 turns
3. 25 cm lap : W-stroke 5-7 cm overhang (smoothing) 5 turns
Foucault :
| Zone | 1 | 2 | 3 | 4 | 5 | 6 | 7 |
| Measurements | 0 | 0,39 | 0,78 | 1,22 | 1,82 | 2,23 | 2,3 |
| Parabola | 0 | 0,98 | 1,81 | 2,63 | 3,45 | 4,27 | 5,05 |
Step 4 Feb 3 , 2004
- Tapered 20 cm lap ( squares diminished towards the edge)
Soft pitch
Straight stroke 0-3 cm from C 5 cm overhang 4x 10 rounds
2. 25 cm lap
W stroke 5-6 cm overhang 5x 1 turn (cold pressing between rounds)
Foucault :
| Zone | 1 | 2 | 3 | 4 | 5 | 6 | 7 |
| Measurements | 0 | 0,35 | 0,84 | 1,54 | 2,22 | 2,65 | 3,01 |
| Parabola | 0 | 0,98 | 1,81 | 2,63 | 3,45 | 4,27 | 5,05 |
The outer zone are difficult to read properly. I am going to use a small telescope to view the zones.
Step 5
- Increasing correcton
20 cm lap straight stroke 0-2 cm from C 5x 10 turns
2. Outer zones
25 cm lap W-stroke 5-7 cm overhang 1 turn .
I made a new 25 cm lap. The old one was too thin.
Ronchi : parabola; weak zone (kink) several cm from edge
| Zone | 1 | 2 | 3 | 4 | 5 | 6 | 7 |
| Measurements | 0 | 0,21 | 1,03 | 1,83 | 2,47 | 3,09 | 3,38 |
| Parabola | 0 | 0,98 | 1,81 | 2,63 | 3,45 | 4,27 | 5,05 |
Conclusion: flat center and high outer zone
Step 6
1. Deepening the center:
15 cm lap straight stroke 0-1 cm left of C 2x 10 turns
2. 20 cm lap ; increasing correction: straight stroke 0-5 cm left of Center 3x 10 turns
3. .Smoothing : 25 cm lap Wstroke 7 x 1 turn
All strokes with 5-7 cm overhang
Ronchi : flat edge and flat center
| Zone | 1 | 2 | 3 | 4 | 5 | 6 | 7 |
| Measurements | 0 | 0,36 | 1,27 | 2,01 | 2,85 | 3,56 | 3,91 |
| Parabola | 0 | 0,98 | 1,81 | 2,63 | 3,45 | 4,27 | 5,05 |
Step 7
a.
15 cm lap: deepening the center: straight stroke through C : 15 turns
b. narrow W-stroke : center of lap between r=5 cm left and right : 3 turns
c. 48 cm lap 1/3 narrow W-stroke Mirror below : 3x 1 turn
d. 48 cm lap : correcting the high edge: ½ straight stroke (overhang12 cm) : 1 turn
It is necessary to scratch the pitch squares to be able to polish properly. Otherwise movement is very jerky.
Ronchi : flat edge and spotty center
Fouc: 2-4 measurements
| Zone | 1 | 2 | 3 | 4 | 5 | 6 | 7 |
| Measurements | 0 | 0,94 | 2,11 | 2,93 | 3,58 | 4,32 | 4,79 |
| Parabola | 0 | 0,98 | 1,81 | 2,63 | 3,45 | 4,27 | 5,05 |
Step 8 feb 7 , 2004
- 20 cm lap W-stroke with emphasis on the outer zones 3x 1 turn
- 15 cm lap
circular stroke 1. edge area: 10 rounds b . from r= – 1 to r= 20 cm 10 turns
Ronchi : high outer zone
Foucault : measurements with the help of the little telescope(3x) are more consistent
3-4 measurements
| Zone | 1 | 2 | 3 | 4 | 5 | 6 | 7 |
| Measurements | 0 | 0,91 | 1,93 | 2,61 | 3,37 | 4,08 | 4,50 |
| Parabola | 0 | 0,98 | 1,81 | 2,63 | 3,45 | 4,27 | 5,05 |
The correction is lessened by working on the edge
Step 9
Increasing correction
- Tapered 20 cm lap (with narrowed edge facets)
Straight stroke 0-1 cm left of C 15 turns
2. 20 cm lap W-stroke 3x 1 turn
48 cm lap :
3. smoothing 1/3 straight stroke 2 turns
4. ½ straight stroke 2x 1 turns (pressing between turns)
Test
Ronchi : worse : parabola but quite a big bulge around the central area
| Zone | 1 | 2 | 3 | 4 | 5 | 6 | 7 |
| Measurements | 0 | 0,75 | 1,66 | 2,38 | 3,20 | 3,88 | 4,26 |
| Parabola | 0 | 0,98 | 1,81 | 2,63 | 3,45 | 4,27 | 5,05 |
Labda/2,5 wavefront error
Step 10 feb 8
Deepening the center
- 15 cm lap (facets narrower at edge)
Straight stroke on center 5 turns
2. straight stroke 1-4 cm left of C ; 10 turns
3. 20 cm lap (facets narrowing at edge) W-stroke within the mirrors edge ;light pressure 5 turns
4. 48 cm lap1/4 W stroke with pressure on edge: 1 turn
3 measurements
| Zone | 1 | 2 | 3 | 4 | 5 | 6 | 7 |
| Measurements | 0 | 0,48 | 1,35 | 2,05 | 2,82 | 3,59 | 4,08 |
| Parabola | 0 | 0,98 | 1,81 | 2,63 | 3,45 | 4,27 | 5,05 |
Edge somewhat better
- Correction lower as a result of the W-stroke and the big lap
Step 11
- Increase the correction!
15 cm lap straight stroke 0-1 cm left of C and 5 cm overhang : 2×10 turns
2. 15 cm lap narrow W-stroke 2,5 cm left and right movement and 5 cm overhang
2 turns
3. 48 cm lap mirror MOT ½ straight stroke 2 x 1 turn
3 measurements
| Zone | 1 | 2 | 3 | 4 | 5 | 6 | 7 |
| Measurements | 0 | 1,02 | 1,75 | 2,67 | 3,30 | 4,05 | 4,62 |
| Parabola | 0 | 0,98 | 1,81 | 2,63 | 3,45 | 4,27 | 5,05 |
Figure : central hill and turned up edge area
——————————————————————————————————–
Step 12
- Working on central hill
20 cm lap with narrowed facets at the edge: narrow W-stroke with 2 cm movement to left and right 3x 1 turn (pressing in between)
2. 48 cm lap MOT ½ straight stroke 3×1 turn
3 measurements
| Zone | 1 | 2 | 3 | 4 | 5 | 6 | 7 |
| Measurements | 0 | 0,87 | 1,50 | 2,34 | 3,08 | 3,94 | 4,65 |
| Parabola | 0 | 0,98 | 1,81 | 2,63 | 3,45 | 4,27 | 5,05 |
Step 13
Turned up edge area is diminishing
- 15 cm lap straight stroke 0-1 cm left of C 5 turns (5 cm overhang)
- New 15 cm lap : narrow W-stroke (2,5 cm left and right) 3x 1 turn
- 48 cm lap narrow W-stroke : 3x 1 turn
2 measurements; close together (differ only 0,05 mm)
| Zone | 1 | 2 | 3 | 4 | 5 | 6 | 7 |
| Measurements | 0 | 0,85 | 1,61 | 2,35 | 3,10 | 4,06 | 4,79 |
| Parabola | 0 | 0,98 | 1,81 | 2,63 | 3,45 | 4,27 | 5,05 |
Edge area becoming lower
Figure peak to valley labda/5.3
Step 14
15 cm lap : deepening the center
- straight stroke 0-3 cm left of C and 5 cm overhang 10 turns with light pressure
2. narrow W 5 cm movement left and right. Edge of lap moves till r=15 -16 cm
2x 1 turn
3. Smoothing : 48 cm lap1/2 to 1/3 W-stroke ; mirror above ; 2×1 turn
| Zone | 1 | 2 | 3 | 4 | 5 | 6 | 7 |
| Measurements | 0 | 0,85 | 1,72 | 2,37 | 3,29 | 4,23 | 4,91 |
| Parabola | 0 | 0,98 | 1,81 | 2,63 | 3,45 | 4,27 | 5,05 |
Strehl = 0,982 Peak to valley 1/13 labda
Star test ; with 33 % central mask image inside and outside F very similar
Ronchi on star : 3-4 straight lines
Aluminizing : Ernst Befort in Wetzlar Germany. Cost for 94 % enhanced coating : 400 euro net (june, 2004)